ウイルス&スパム対策(Amavisd-new + AntiVir + Spamassassin)
おやじのところでは、メールのウイルス対策として H+BEDV の 「AntiVir Mailgate for Linux」を利用させてもらっていましたが、フリーでは利用はできなくなってしまいましたので何らかの対策が必要になりました。対策のひとつとしては、H+BEDV
の AntiVir にはLinux用で「AntiVir PersonalEdition Calssic Workstation」というソフトがフリーで提供されているのでこれを利用する方法があります。但し、これは名前のとおりWorkstation用なので、このままではPostfixと連携してリアルタイムのウイルススキャンを行うことはできません。そこで、Postfix
との中継役としてはAmavisd-newを使用しウイルススキャナとして利用することで、「AntiVir Mailgate for Linux」と同等にウイルス除去が可能になります。また、Amavisd-newはSpamassassinも統合できるのでスパム対策もあわせて行いました。(スパム対策を行わないことも可能。)
ここではバーチャルドメイン環境に導入することを前提に記述していますが、もちろん通常環境でも同じ設定で使用できます。(普通のユーザディレクトリに配送するなら
Procmail で処理したほうが良いかもしれません。)
なお、Postfix は既にインストールされて動作しているものとします。
ここでの方法は、性能面では負荷がかかるとともに、起こったことはないのですが配送が複雑なので事故が気になります。そのような方は、若干環境整備が大変ですが
Maia Mailguard というWebベースの管理ツールがありますので、試してみると良いでしょう。こちらを使用すると、Procmailや下記のフィルタ関係の処理が不要になりすっきりする他、ユーザ毎のフィルタ管理がwebベースできるなどかなり便利です。
■メールの振り分け
バーチャルドメイン環境の場合、最終的なメールの配送は「virtual」配送エージェントで行うため、 Spamassassin がスパムとマークしたメールを
procmail で振り分けることができません。(可能なのかもしれませんが、おやじはやり方がわかりません。) そこで、Postfixの
フィルタのReadmeを参考にフィルタリングすることにしました。
バーチャルドメイン対応のPostfix + Amavisd-new + AntiVir + Spamassassin 時のメール配送フローを整理してみました。
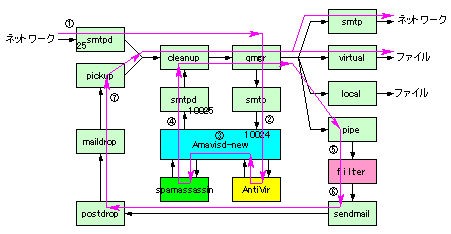
概略の動作は以下のとおりです。
- SMTP/SMTPSでメールを [smtpd] サーバで受信する。
- 受信したメールは [cleanup]、[qmgr]
サーバ経由で配送されるが、main.cf の contents_filter で付与されたレコード(
smtp-amavis:[127.0.0.1]:10024 ) により [smtp] サーバで Amavisd-new
の10024ポートへ配送される。
- Amavisd-new が受信したメールは中継され、 AntiVir でウイルススキャンを Spamassassin でスパムのスキャンを行う。 Spamassassin
ではマーキングのみを行う。
- スキャニングを終了したメールは、localhostの10025番ポートで待ち受ける Postfix の [smtpd]
に返送する。通常この後は、Spamassassin のスキャニング結果をProcmailでスパムの分離を行うが、 [virutual]
配送エージェント ではProcmailが使用できない(.正しくは、".forward" が使用できない)ので外部スクリプト( filter )
で調査しスパムを分離するため、contents_filter で配送条件を設定(メールにレコードを付加)する。
- 受信したメールは 2項と同様のルートである [cleanup]、[qmgr]
サーバを経由して配送されてくるが、前項で付与したレコードにより filter スクリプトへ配送される。
- filter スクリプトではスパムメールか否か判断し、スパムなら配送先をスパム受信用ユーザに変更し [sendmail]
互換コマンドでpostfixに戻し、[virutual] 配送エージェントや [smtp]
クライアントでバーチャルユーザや他のSMTPサーバに配送する。
- [sndmail] 互換コマンドで受信したメールは [pickup] サーバ経由で配送されるため、デフォルトのままでは
main.cf で設定したcontent_filterの設定が付与されて再度Amavis-newに流れてループしてしまうので、master.cf で
[pickup] サーバからはcontent_filter
を付与しないように設定する。
実害はないと思うが、これによりCGI等で送信したsendmailコマンド経由のメールやローカルでデーモンが吐いたメール([pickup]
サーバが拾う)は、ウイルス及びスパムのスキャンが行われないので注意が必要である。(可能性としては、ファイアル添付できる掲示板のようなのもので、投稿内容をメールで配送するようなものだと可能性がある?)。
■AntiVir Mailgate for Linuxのアンインストール
「AntiVir Mailgate for Linux」を動かしていた環境に「AntiVir PersonalEdition Calssic Workstation」をインストールすると、多くの部分でぶつかる部分があるので「AntiVir Mailgate for Linux」をアンインストールしてから作業しないと問題が発生する可能性があります。
- 「AntiVir Mailgate for Linux」を停止するため、Postfixとの連携を停止する。
/etc/postfix/master.cfを編集して、「AntiVir Mailgate for Linux」用に追加した下記を削除する。
|
localhost:smtp-backdoor inet n - n - - smtpd -o content_filter= |
- /etc/postfix/main.cfを編集して、「AntiVir Mailgate for Linux」用に追加した下記を削除する。
|
content_filter = smtp:127.0.0.1:10024 |
- Postfixを再起動し、「AntiVir Mailgate for Linux」を停止する。
|
# /etc/init.d/postfix reload
# /etc/init.d/avgate stop
# insserv -r avgate
|
- 「AntiVir Mailgate for Linux」の関連ファイルを削除する。YaSTでインストールしたのなら、YaSTでアンインストールすればよい。ここでは、個別にアンインストールする場合を示す。
|
# rm -rf /usr/lib/AntiVir
# rm -rf /var/spool/avmailgate
# rm /etc/avmailgate*
# rm /etc/antivir.conf
# rm /etc/init.d/avgate
# rm /usr/bin/antivir
# rm /usr/sbin/antivir
# rm /usr/sbin/avgated
# rm /usr/sbin/avgatefwd
|
■ウイルススキャナのインストール
「AntiVir PersonalEdition Calssic Workstation」をH+BEDV の
PersonalProduct のサイトからダウンロードしてきてインストールします。なお、「AntiVir PersonalEdition Calssic Workstation」を使用するための登録は必要なく、ライセンスファイルがダウンロードしたファイルに含まれています。実際のダウンロードページは
こちらです。
- 「AntiVir PersonalEdition Calssic Workstation」をダウンロードしてインストールし、ウイルス定義ファイルをアップデートしておく。
|
# cd /usr/local/src
#
wget http://free-av.com/personal/en/unix/antivir-workstation-pers.tar.gz
#
tar zxfv antivir-workstation-pers.tar.gz
#
cd antivir-workstation-pers*
#
./install
Starting AntiVir for UNIX Workstation 2.1.5-24 installation...
Before installing this software, you must agree to the terms
of the license.
Use the arrow keys to scroll through the license. When you
are finished reading, press 'q' to exit the viewer.
Press <ENTER> to view the license.
[Enter]
# ライセンスの説明がズラズラと出てくるので、フリーで使えることに感謝して [Space]を押し続ける。
(snip)
# 最後まできたら [:]、[q] でライセンスの説明から抜ける。
[:]、[q]を押す。
# ライセンスに同意するか聞いてくるので、[y]と入力。
Do you agree to the license terms? [n] y [Enter]
# ここでスキャンエンジンのインストールが行なわれる。
creating /usr/lib/AntiVir ... done
1) installing command line scanner
checking for existing /etc/antivir.conf ... not found
copying bin/antivir to /usr/lib/AntiVir/ ... done
copying vdf/antivir0.vdf to /usr/lib/AntiVir/ ... done
copying vdf/antivir1.vdf to /usr/lib/AntiVir/ ... done
copying vdf/antivir2.vdf to /usr/lib/AntiVir/ ... done
copying vdf/antivir3.vdf to /usr/lib/AntiVir/ ... done
copying etc/antivir.conf to /etc/ ... done
# ライセンスファイルのパスを聞いてくるので、そのまま[Enter]。
Enter the path to your key file: [hbedv.key] [Enter]
copying hbedv.key to /usr/lib/AntiVir/hbedv.key ... done
copying script/configantivir to /usr/lib/AntiVir/ ... done
installation of command line scanner complete
# ここでスキャンエンジンとウイルス定義ファイルの自動アップデートに関する設定を行う。
2) installing automatic internet updater
An automatic internet updater is available with version 2.1.5-24 of
AntiVir for UNIX Workstation. This is a daemon that will run in the background
and automatically check for updates (internet access is required).
You may also manually check for updates using:
antivir --update
You do not need to install the automatic internet updater in order
to manually check for updates. Please read the README file for more
information on updates and how they can best suit you.
# 自動アップデートするか聞いてくるので、今回はデフォルトの手動アップデートで行うこととしそのまま[Enter]。
Would you like to install the automatic internet updater? [n] [Enter]
automatic internet updater will NOT be installed
# リアルタイムスキャンのためAvGuardをインストールするか聞いてくるが、今回はAmavisd-newでウイルススキャナとして利用するだけなのでデフォルトの[n]のまま[Enter]。
3) installing AvGuard
Version 2.1.5-24 of AntiVir for UNIX Workstation is capable of on-access,
real-time scanning of files. This provides the ultimate protection
against viruses and other unwanted software. The on-access scanner
(called AvGuard) is based on Dazuko, a free software project providing
access control. In order to use AvGuard you will need to compile Dazuko
for your kernel. Please refer to contrib/dazuko/HOWTO-Dazuko for
information about how to do this. There are several ways in which you
can install AvGuard.
module - Dazuko will be loaded by the avguard script
kernel - Dazuko is always loaded
(and should not be loaded by the avguard script)
no install - do not install AvGuard at this time
Note: Dazuko currently only works with GNU/Linux, FreeBSD and Solaris
systems. If you are interested in helping us port Dazuko to
OpenBSD, feel free to check out the Dazuko Project at:
http://www.dazuko.org
available options: m k n
How should AvGuard be installed? [n] [Enter]
AvGuard will NOT be installed. See contrib/dazuko/HOWTO-Dazuko
for more information about Dazuko.
# ワークステーションで使用するGUIをインストールするか聞いてくるが、今回はAmavisd-newでウイルススキャナとして利用するだけなのでデフォルトの[n]のまま[Enter]。
4) installing GUI (+ SMC support)
Note: The AntiVir Security Management Center (SMC) requires this
feature, even if you do not intend to use the GUI.
This product comes with a GUI that allows you to monitor realtime
activity, view logs, and configure the product. This tool is optional
(not required) for the product to run.
The GUI requires Java 1.4.0 or higher.
Would you like to install the GUI (+ SMC support)? [n] [Enter]
checking for existing /etc/avguard.conf ... not found
copying etc/avguard.conf to /etc/ ... done
GUI will NOT be installed
# AntiVirの設定を行うか聞いてくるので、そのまま[Enter]して設定を行う。
5) configuring AntiVir
Would you like to configure AntiVir now? [y] [Enter]
# 警告メールを使用するか否か設定する。
EmailTo (1 of 4)
=======
You may set AntiVir to send out an email message every time a concerning
file is accessed. The message will also list the action that was taken
to handle the file.
available options: y n
# 警告メールを使用するためそのまま[Enter]。
Would you like email notification of alerts? [n] y [Enter]
# 通知アドレスを設定する。
What email address will receive notifications? [] postmaster@mail.aconus.com [Enter]
LogTo (2 of 4)
=====
In addition to logging concerning activity through syslog, you may
also specify your own log file. This can make it simpler to review
past concerning activity without having to sift through syslog files.
available options: y n
# AntiVirのログを専用ファイルにするか否かを設定する。デフォルトはsyslogであり、今回はsyslogとしたのでそのまま[Enter]。
Would you like AntiVir to log to a custom file? [n] [Enter]
# AntiVirのアップデートはHTTPで行うため、Proxyがあるなら設定をする。
HTTPProxyServer/HTTPProxyPort (3 of 4)
=============================
If this machine is sitting behind an HTTP proxy server, you will need to
configure AntiVir with the appropriate proxy settings. Internet access
is required in order to make updates.
available options: y n
Does this machine use an HTTP proxy server? [n] [Enter]
# Syslogのファシリティとプライオリティを設定する。デフォルトのままとしたので、そのまま[Enter]。
SyslogFacility/SyslogPriority (4 of 4)
=============================
Regardless of the other configuration options, AntiVir will always log
important information using syslog. Syslog uses two values to classify
the information to log: facility and priority. Facility specifies the
type of program making the log entry. Priority specifies the importance
of the log entry.
If you are unfamiliar with syslog then you may simply accept the default
values. However, it is encouraged that you learn about syslog since it
is used by many services to log important events.
available FACILITIES: authpriv cron daemon kern lpr mail news syslog user uucp
local0 local1 local2 local3 local4 local5 local6 local7
Which syslog FACILITY should AntiVir use? [user] [Enter]
available PRIORITIES: emerg alert crit err warning notice info debug
Which syslog PRIORITY should AntiVir use? [notice] [Enter]
# 上記で設定してきたAntiVirの設定情報が表示されるので確認する。
AntiVir Configuration
=====================
Here are the configuration settings you have specified. Look them over
to make sure they are correct.
email notification: postmaster@mail.aconus.com
specific logfile: no
update frequency: never
syslog output: user.notice
available options: y n
Save configuration settings? [y] [Enter]
saving configuration to /etc/antivir.conf ... done
Configuration Complete
======================
email notification: postmaster@mail.aconus.com
specific logfile: no
update frequency: never
syslog output: user.notice
Press <ENTER> to continue.[Enter]
Here are some commands that you should remember...
AntiVir
=======
configure: /usr/lib/AntiVir/configantivir
Press <ENTER> to continue.[Enter]
Installation of the following features complete:
AntiVir command line scanner
AntiVir Guard (previously installed)
Note: It is highly recommended that you perform an update now to
ensure up-to-date protection. This can be done by running:
antivir --update
Be sure to read the README file for additional information.
Thank you for your interest in AntiVir for UNIX Workstation.
|
- ここで、ウイルス定義ファイルをアップデートしておく。
|
# antivir --update
AntiVir / Linux Version 2.1.5-24 +gui
Copyright (c) 1994-2005 by H+BEDV Datentechnik GmbH.
All rights reserved.
Warning: the file "antivir.vdf" is more than 14 days old
checking for updates
06.32.00.60 = 06.32.00.60 [vdf database (part 0), on-disk]
06.32.18.16 < 06.33.00.207 [vdf database (part 1), on-disk]
06.32.18.17 < 06.33.00.220 [vdf database (part 2), on-disk]
06.33.00.07 < 06.33.00.228 [vdf database (part 3), on-disk]
06.33.00.11 < 06.33.00.31 [scan engine, running]
06.33.00.11 < 06.33.00.31 [scan engine, on-disk]
antivir1.vdf 100% |************************************| 1133 KB 141.66 KB/s 0:00 ETA
antivir2.vdf 100% |************************************| 49 KB 49.66 KB/s 0:00 ETA
antivir3.vdf 100% |************************************| 34 KB 0.00 KB/s --:-- ETA
antivir 100% |*****************************************| 634 KB 42.33 KB/s 0:00 ETA
06.32.00.60 = 06.32.00.60 [vdf database (part 0), on-disk]
06.33.00.207 = 06.33.00.207 [vdf database (part 1), on-disk]
06.33.00.220 = 06.33.00.220 [vdf database (part 2), on-disk]
06.33.00.228 = 06.33.00.228 [vdf database (part 3), on-disk]
06.33.00.31 = 06.33.00.31 [scan engine, on-disk]
scan engine 06.33.00.11 --> 06.33.00.31 (/usr/lib/AntiVir/antivir)
vdf database 06.33.00.07 --> 06.33.00.228 (/usr/lib/AntiVir/antivir1.vdf, /usr/lib/AntiVir/antivir2.vdf, /usr/lib/AntiVir/antivir3.vdf)
AntiVir updated successfully
|
- ウイルス定義ファイルを自動アップデートするため、/etc/crontab に下記を追加する。下記は毎日4:03に更新する例である。
|
03 04 * * * root /usr/bin/antivir --update -q |
■Spamassassin のインストール
事前準備として、Spamassassinのインストールとフィルタ専用のユーザおよび作業ディレクトリを作成しておきます。その後に、YaSTで
perl-spamassassin とspamassassin をインストールします。
◆事前準備
- まずは、フィルタ専用のユーザおよび作業ディレクトリを作成する。
|
# mkdir /home/filter
# groupadd -g 10001
filter
# useradd -g filter -u 10001 -d /home/filter -s /bin/false
filter
# chown filter:filter /home/filter
# mkdir
/var/spool/filter
# chown filter:filter /var/spool/filter
# chmod
700 /var/spool/filter |
- YaST コントロールセンタを起動し、「ソフトウェア」の「ソフトウェアのインストール/削除」を起動する。
- 「フィルタ」 を 「検索」 とし検索欄に 「spamassassin」 と入力し 「検索」 ボタンを押す。
- 右側に該当するパッケージが出てくるので、perl-spamassassin とspamassassinにチェックマークを入れて 「了解」
を押しておしまい。
- SuSEのデフォルトのRPMから、即ち2.6系からアップデートした場合、3.0系では -a
オプションがなくなった関係で設定変更しないと起動エラーになります。本設定変更はYaSTで行います。(新規の場合は本作業は不要)
・YaST
コントロールセンタを起動し、「システム」の「/etc/sysconfig エディター」を起動する。
・「設定のオプション」 で 「Network」
-> 「Mail」 -> 「Spamassassin」 ->
「SPAMD_ARGS」と開き、「設定」欄でパラメータから「-a」を削除(「-d -c -L」を残す)し、 「完了」 ボタンを押す。
- ここでspamdを起動しておきます。
|
# insserv spamd
# chkconfig --list
spamd
spamd
0:off 1:off 2:off 3:on
4:off 5:on 6:off
# /etc/init.d/spamd
start |
◆フィルタスクリプトの作成
フィルタのReadmeを参考に、以下のようなフィルタスクリプトを /usr/local/bin/spam-filter
として作成しました。処理としては、受け取ったメールのSpamassassin
が付与したSpam-StatusがYesになっている場合はspam専用ユーザ(spam@mail.aconus.com)に配送するようにしました。誤配送があるので、いきなり捨てることはしていません。
|
# vi
/usr/local/bin/spam-filter
[i]で以下を挿入。
#!/bin/sh
#
Simple shell-based filter. It is meant to be invoked as follows:
#
/path/to/script -f sender recipients...
# Localize
these.
INSPECT_DIR=/var/spool/filter
SENDMAIL="/usr/sbin/sendmail
-i"
SPAMASSASSIN=/usr/bin/spamc
# Exit codes from
<sysexits.h>
EX_TEMPFAIL=75
EX_UNAVAILABLE=69
# Clean
up when done or when aborting.
trap "rm -f in.$$" 0 1 2 3 15
#
Start processing.
cd $INSPECT_DIR || {
echo
$INSPECT_DIR does not exist; exit $EX_TEMPFAIL; }
cat >
in.$$
grep -e "^X-Spam-Status:.Yes" in.$$ \
&& $SENDMAIL "spam@mail.aconus.com" < in.$$ \
|| $SENDMAIL "$@" <
in.$$
exit $?
[Esc]、[:]、[w]、[q]で保存。
# chmod 700
/usr/local/bin/spam-filter
# chown filter:filter
/usr/local/bin/spam-filter |
■Amavisd-new のインストールと設定
SuSE の場合、Amavisd-new はRPM があるので YaST でインストールするだけです。
- YaST コントロールセンタを起動し、「ソフトウェア」の「ソフトウェアのインストール/削除」を起動する。
- 「フィルタ」 を 「検索」 とし検索欄に 「amavisd-new」 と入力し 「検索」 ボタンを押す。
- 右側に該当するパッケージが出てくるので、その中の赤字のものとYaST関係にチェックマークを入れて 「了解」
を押しておしまい。なお、関連モジュールが山ほどインストールされる。
- 続けて、「システム」の「/etc/sysconfigエディター」を起動する。「Network」->「Mail」->「Amavis」と開き、「USE_AMAVIS」を選択し、右側で設定が「yes」になっていることを確認(「no」なら「yes」に変更)し、「完了」をクリックする。
- Amavisd-new の /etc/amavisd.conf の設定を行う。
$mydomain = 'mail.aconus.com'; #
'example.com'からメールドメインに変更
(snip)
#$sa_spam_subject_tag = '***SPAM*** '; ← 行頭に#を追加してコメントアウト
(デフォルトではスパムメールの件名に頭に'***SPAM***
'という文字が入るが、誤判定したメールのham学習に支障を来たすので入れないようにする。) |
SuSEのAmavisd-newの場合、デフォルトでH+BEDV AntiVirを検出するようになっているのでそのままでよいが、一応下記のように関連部分がコメントアウトされていないことを確認する。他デストリ等では下記の5行の行頭の#を削除(緑字:削除)し有効にする。
###
http://www.hbedv.com/ or http://www.centralcommand.com/
# ['H+BEDV AntiVir or CentralCommand Vexira Antivirus',
#
['antivir','vexira'],
# '--allfiles -noboot -nombr -rs -s -z {}', [0], qr/ALERT:|VIRUS:/,
#
qr/(?x)^\s* (?: ALERT: \s* (?: \[ | [^']* ' ) |
# (?i) VIRUS:\ .*?\ virus\ '?) ( [^\]\s']+ )/ ],
# NOTE: if you only have a demo version,
remove -z and add 214, as in:
# '--allfiles -noboot
-nombr -rs -s {}', [0,214], qr/ALERT:|VIRUS:/,
#
According to the documentations, the new version of Vexira has
# reasonable defaults, one may consider: "--timeout=60
--temp=$TEMPBASE {}" |
- このままではAmavisd-newが起動しないので、以下で起動およびシステム起動時に自動起動するようにしておく。
|
# insserv amavis
#
chkconfig --list amavis
amavis
0:off 1:off 2:off
3:on 4:off 5:on 6:off
#
/etc/init.d/amavis start |
■Postfix の設定
最後にPostfix関係の設定を行います。
- Postfix の /etc/postfix/main.cf に [smtpd] サーバで受信したメールをAmavisd-new
10024番ポートにfowarding する設定を追加する。
|
# postconf -e
'content_filter=smtp-amavis:[127.0.0.1]:10024'
# postconf -e
'max_use=10' |
- Postfix の /etc/postfix/master.cf に下記を追加する。なお、実際の設定時は、smtp-amavis
と127.0.0.1:10025 の行頭に空白を入れないことと、オプション行の先頭と行内のパラメータの区切りは「Tab」を使用すること。空白ではエラーとなることがあるので注意が必要である。(赤字:追加、青字:変更)
|
#
==========================================================================
#
service type private unpriv chroot wakeup
maxproc command + args
#
(yes) (yes) (yes) (never)
(100)
#
==========================================================================
smtp
inet n -
n -
- smtpd
smtps
inet n -
n - -
smtpd
-o smtpd_tls_wrappermode=yes
-o smtpd_sasl_auth_enable=yes
pickup fifo
n - n
60 1
pickup
-o content_filter=
filter
unix - n
n - 10
pipe
flags=Rq user=filter
argv=/usr/local/bin/spam-filter -f ${sender} --
${recipient}
smtp-amavis unix - -
n -
2 smtp
-o
smtp_data_done_timeout=1200
-o
smtp_send_xforward_command=yes
-o
disable_dns_lookups=yes
-o max_use=20
127.0.0.1:10025 inet n - n
- -
smtpd
-o content_filter=filter:dummy
-o local_recipient_maps=
-o relay_recipient_maps=
-o smtpd_restriction_classes=
-o smtpd_delay_reject=no
-o smtpd_client_restrictions=permit_mynetworks,reject
-o smtpd_helo_restrictions=
-o smtpd_sender_restrictions=
-o smtpd_recipient_restrictions=permit_mynetworks,reject
-o smtpd_data_restrictions=reject_unauth_pipelining
-o smtpd_end_of_data_restrictions=
-o mynetworks=127.0.0.0/8
-o strict_rfc821_envelopes=yes
-o smtpd_error_sleep_time=0
-o smtpd_soft_error_limit=1001
-o smtpd_hard_error_limit=1000
-o smtpd_client_connection_count_limit=0
-o smtpd_client_connection_rate_limit=0
-o receive_override_options=no_address_mappings,no_header_body_checks,no_unknown_recipient_checks |
[pickup]
- main.cf で設定した contemt_filter は [pickup] サービスでも適用されるため、デフォルトのままでは filter
と Postfix 間でループが発生してしまう。そのため、[pickup] で受けたメールの contemt_filterを
上書きして無効にし最終的な配送にまわすため、「content_filter=」を追加する。これを忘れるとメールがループするので注意。
[filter]
- filter は、フィルタのReadmeを参考に設定する。
[smtp-amavis]
- smtp-amavis は、Amavisd-newのREADME.postfxを参考に設定する。
[[127.0.0.1:10025]
- ここも、Amavisd-newのREADME.postfxを参考に設定する。
- 但し、「-o content_filter=filter:dummy」 はmain.cf の設定を上書きし、Amavisd-newからのメールをコンテンツフィルタ(
filter スクリプト )に配送するための設定。この設定を忘れると、メールがPostfix <-> Amavisd-newでループするので要注意。
- PostfixAdminの転送機能を利用していると、README.postfxの設定では転送先に2通同じメールが配送されてしまう。その対策として、上記のように receive_override_options に 「 no_address_mappings
」を追加する。
なお、上記では転送元にも配送されるが、転送先にだけに配送すればよい場合は、main.cf に「 receive_override_options
= no_address_mappings 」を追記すればよい。
- ウイルス/SPAM検出時のメール通知ユーザを追加するが、バーチャルドメインの場合は、Postfix Admin で alias(別名)を追加する。通常は、aliases(/etc/aliases) にウイルス/SPAM検出時のメール通知ユーザを追加する。設定後、newaliases すること。
|
# vi /etc/aliases
virusalert: root
spamalert: root
[Esc],[:],[w],[q]で保存。
#
newaliases |
■動作の確認
まずは、Amavisd-new と Postfix を再起動します。netstat で 10024(Amavisd-new)、
10025(Postfix)があるか確認しておきましょう。
|
# /etc/init.d/amavisd
start
# /etc/init.d/postfix restart
# netstat -an
--tcp
Active Internet connections (servers and established)
Proto
Recv-Q Send-Q Local Address Foreign Address
State
(snip)
tcp
0 0 127.0.0.1:10024 0.0.0.0:*
LISTEN
tcp 0
0 127.0.0.1:10025 0.0.0.0:*
LISTEN
(snip)
tcp
0 0 0.0.0.0:465
0.0.0.0:* LISTEN
tcp
0 0 0.0.0.0:25
0.0.0.0:*
LISTEN
|
正常な動作が確認できたら、テスト用のウイルスを
eicarのWebサイトからダウンロードして、ウイルスが検出できるのか確認しましょう。4種類のテストウイルスがあるので、全てテストしてみましょう。うまく検出されれば、管理者宛及び送信者宛にウイルスアラートのメールが送信されるはずです。
Top Pageへ
)